

Get outside! When temperatures drop below freezing we like to stay inside and get nice and comfortable. Cooking and Netflix seem to occupy our time. The days are shorter and motivation is lacking. Well, let me tell you now it is the best time to hike, especially in Yosemite. There are no insects or snakes, people and noise are at a minimum. If you love nature, peace and serenity, winter is where its at.
Obviously, winter hiking has it challenges. Most important is how to dress and how to manage your layers. First, hands and feet must stay dry and warm. Good boots and good gloves are a must. Most importantly, a positive attitude and the willingness to do something hard but fun. Below are a couple tips before we dive into some of the best locations.
Footwear
They say one pound on your feet is equal to five pounds on your back, but nice waterproof insulated boots are very important. It may take time to build strength and endurance when wearing big boots but to me it is totally worth it. Good boots give confidence to walk on ice and snow, through water, over branches and leap from boulder to boulder. This confidence is very important to help prevent any falls and injuries. There are many expensive brands out there and it is easy to think the more expensive a product is the better it will be but when it comes to footwear as long as it has a nice shell and provides warmth I prefer to spend money on the insole. You can easily find some affordable boots at Big 5 or Farm and Fleet and then put in some active insoles to create a little more cushion and comfort. Below is a link to the boots that have gotten me through some pretty harsh weather conditions.
Gloves
When winter hiking, trails can be a little messy and by that I mean, trees are down and might block routes, also there can be standing water that might require some climbing. For me I always bring tight fitting work gloves. These are crucial for navigating on sharp rocks, pointy branches and even when you have to get on your hands and knees and climb under downed trees. They also provide just enough warmth but don’t cause you to sweat like most winter gloves. These gloves are beneficial because you can still you use your hands for photography or use your phone without taking them off. You can pick these up at any Ace or hardware store. Here is a link to what I find to be very comfortable and tough:
Layering
Every human is a little different when it comes to temperature tolerance. I run warm and my body creates a lot of heat. It is very important when winter hiking that you try to sweat as little as possible. Plan ahead and think what is the minimum amount of clothes I will be comfortable in and then build up from there. The best base layer is always going to start with quick-dry material. That way if you do sweat it dries fast, being wet is usually the cause of being cold.
I usually wear a short sleeve and a long sleeve quick dry and then a long sleeve shell. This is what I can hike in at at about 32 degrees comfortably, especially when it is a moderate to challenging hike. A warm sweater and a jacket for when you stop and take a break is a must. The cold sets in fast when you stop moving. Definitely, don’t forget a nice waterproof shell on the outside. A goose down vest is nice because it folds up to almost nothing and is easy to put in a pack. Typically, for your legs, waterproof pants are adequate. If the temperatures are below 20 I recommend quick-dry thermals. Those are some tips for staying comfortable while on the trails in the winter.
Top Hikes in Yosemite National Park and Surrounding Area
1. Hetch Hetchy – Hike to Wapama Falls (about 5 miles total round trip and about 1000 feet of elevation change)
At 3900 feet elevation, this area can be a little warmer than some of the other parts of Yosemite, not to mention the trail is on the Northside of the valley and receives the most sunlight during the day. Some obstacles that you can run into here are, waterfalls and creeks might make some areas dangerous and uncrossable. Pay attention to weather trends and conditions. Typically if there has been a lot of snow in the high country any day that tops 40 degrees can cause excessive water to flow into the reservoir and might make the trail too wet.
This trail starts at the O’Shaugnessy Dam and is relatively flat at the beginning. You start out walking over the dam and views in both directions are amazing. You can see your destination, Wapama Falls, across the reservoir approximately two and a half miles away. In the other direction you can see the valley as it was meant to be with the Tuolumne River weaving down hill towards the San Joaquin Valley. Passing through the tunnel is exciting and is lit but I would recommend bringing a headlamp or flashlight just incase a light is out or it’s not a bright sunny day. When I passed through there were icicles along the walls of the tunnel so its a little bit cooler in the tunnel.
Your first elevation gain begins and you cross a couple small creeks. Most of these are seasonal and are snow fed. This is where it is important to have proper footwear because for long stretches you might be walking through water that is a couple inches deep. The first intersection you take a right towards the reservoir and you take a couple switchbacks down and you have great views down into the valley where the snow is thick on the mountain tops. The first waterfall that is mostly year round is Tueeulala Falls and it is a falls that has many different arms that break off and you might have to cross the creek a couple times. Be careful there can be some slippery spots when crossing.
The trail can be a little tough on the feet because small granite boulders can be uneven and loose but for the most part it is flattened dirt and very easy to hike. Once you arrive at Wapama Falls you can feel its strength and hear its power, the payoff is beautiful. This waterfall finds its route through huge granite boulders and can even rage over the footbridge. A trail crew gentlemen joined me on this day to put down a warning sign because the waterfall was flowing at a safe cubic feet per second (CFS) but informed me that a couple weeks ago there was an event that may have resulted in a fatality. It is always best to be cautious when it comes to rivers and creeks, their power is hard to judge until its too late.


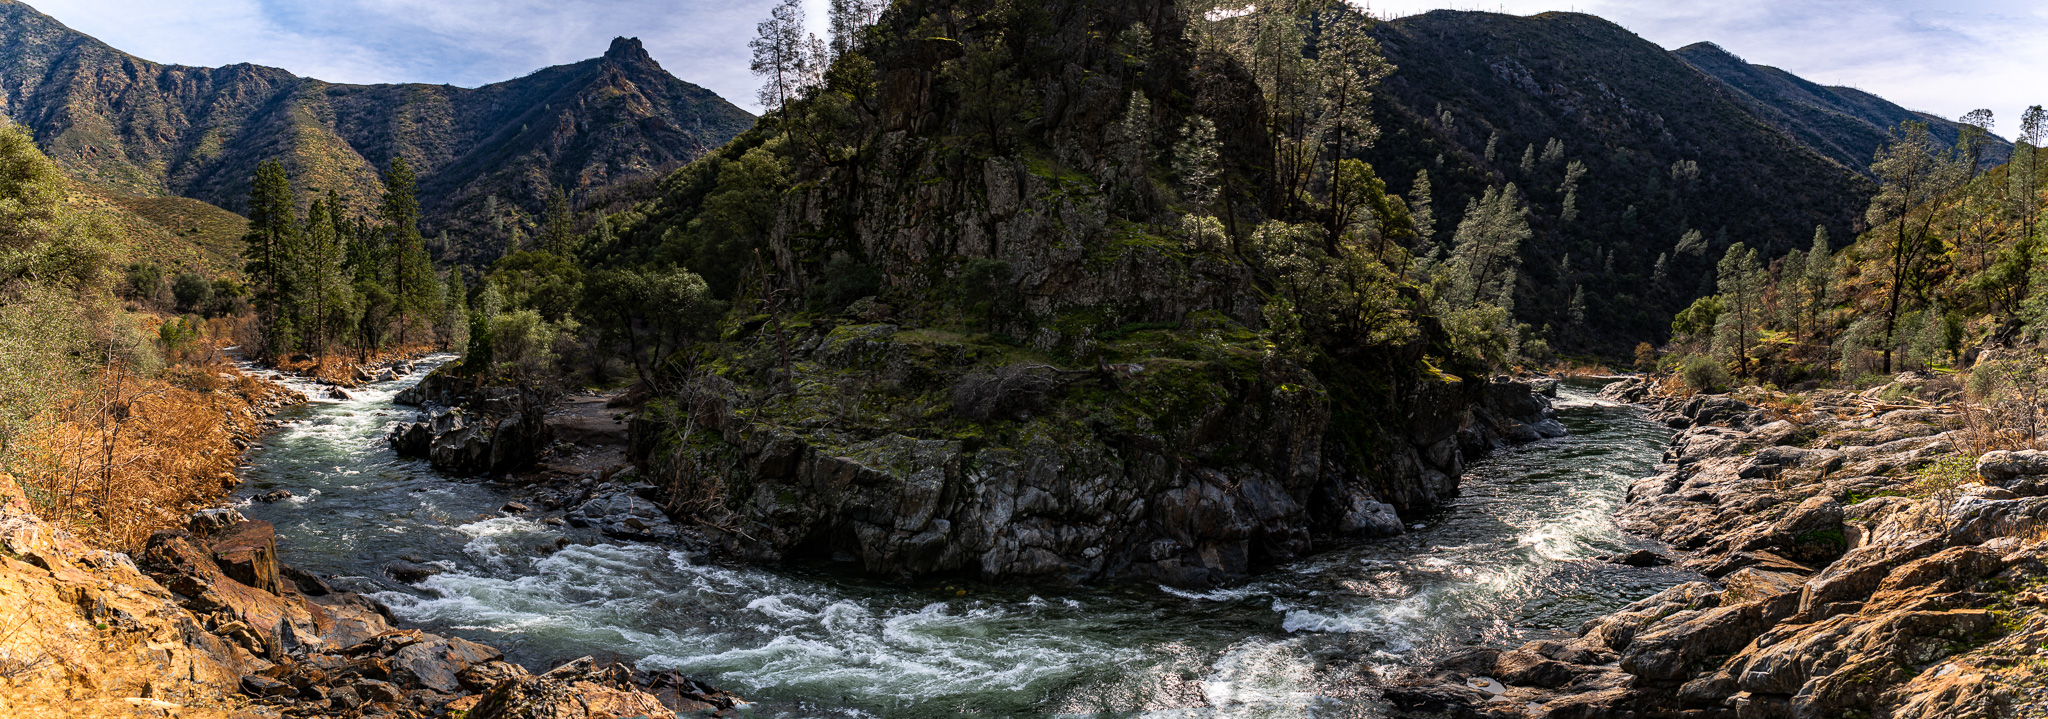
2. Hite’s Cove Trail – Hike along the South Fork Merced River
This out and back trail is also at a lower elevation and traverses the cliffs that go along the banks of the South Fork of the Merced River. This trail begins at the Savage’s Trading Post with a small parking lot located on the river side of the road. There is a well marked sign located at the trail head. The beginning of the trail starts on private property but you are allowed to travel through and the incline at the start is a little steep. You definitely get the heart rate going right off the bat. Not only do you start with a good hill climb but then you get to a nice narrow path with quite a drop-off that falls into the river, so be careful and make sure you have good balance.
The first part of the trail is high above the river with gorgeous views around every corner. After leaving private property you enter the Sierra National Forest, this area has definitely been effected by wildfires and most of the hillsides are bare or covered with grasses. This means not a lot of shade and that is why I recommend this as a winter hike because it gets very warm in the summer and fire threats are common.
Hiking along the river is a lot of fun and there are a lot of changes of elevation. The river has rapids and flat smooth spots, multiple big bends and curves of the river create beautiful flowing water. The destination at Hite’s Cove was once a thriving small community that hosted about 100 residents and actually had a post office and hotel at one time. There was a bridge at one time but no longer exists and it would probably would not be wise to try and cross the river. All of the buildings burned down in the early 1900s but there lie relics from some of the rusted old machinery.
Overall, as the seasons change there will be more flowers in the month of March and this becomes a popular trek. Even in early February there were seedlings and poppy’s starting to germinate. I also saw a few birds and a Sierra Newt. I passed only 2 other people on the trail even though it almost reached 70 degrees on a gorgeous day.


3. Top of Vernal Falls (Winter Route) – Start on John Muir Trail and take winter route to top of Vernal Falls
The first difficult hike on the list is the hike to Vernal Falls and even Nevada Falls if you want to go a little further. You could also stop at the Vernal Falls footbridge for a nice short hike. But beware this trail is very icy and dangerous. Yaktrax or some sort of traction for feet is required. The beginning of the John Muir Trail is a heavily trafficked route and because of this the snow becomes packed and virtually becomes a steep slide down the mountain. The trail begins at a parking lot just past Curry Village. You begin by either walking down the road or through the forest and the fen, a unique swamp area that is a winter bog of sorts.
Once you cross the bridge you begin on the John Muir Trail and hike up the Merced River. A very steep slippery incline as mentioned previously will get you to a bridge for a view of Vernal Falls. Continue on and you will see where the Mist Trail is closed and you enter a section of switch backs that goes directly up to Clark Point. This part of the trail is less traveled and the snow wasn’t as slippery. It is difficult and there were a couple avalanches that covered some of the trail. The reward is breathtaking, Clark Point offers 360 degree views with the highlight being Nevada Falls and Liberty Cap a nearby dome that protrudes proudly into the sky. Also, nearby are Half Dome and even an amazing view across Yosemite Valley and the sight of Yosemite Falls.
After Clark Point you actually descend back down to the river where I went to a bridge that had amazing blue ice forming on the banks. This was my lunch stop where I enjoyed the sound of the rushing water and crashing ice and snow avalanches in the distance. Back the way I came and then I veered off to the right where the top of Vernal Falls has a viewpoint. The top of this waterfall is very impressive and you can get real close. Looking back down the canyon to where the journey began is nice sight and you can see why the alternate summer route, the Mist Trail, got its name.
Overall, this hike got me a little tired as most of the time you are walking on snow or ice and trying not to fall. It definitely does not disappoint when it comes to peace and serenity most people will stop at the footbridge and you will have the rest of the trail to yourself. Just remember to bring proper footwear and be prepared for colder temps the higher you navigate.


Check out prints for sale from the Yosemite Winter Collection.

Don’t forget when you’re out on the trails to leave no trace and try to pick up any litter or garbage you may find. Also any fine art photography purchased on Granite Cliff Studio’s website, 5% will go to the Yosemite Conservancy.
One response to “Best Winter Hiking In And Around Yosemite National Park”
[…] Best Winter Hiking In And Around Yosemite National Park […]